Tuesday, August 23, 2011

time to chase the ice cream truck

Work on my family room has ground to a halt and the house is in utter chaos. There are boxes everywhere, furniture stacked in inconvenient places and my desk shoved into a tiny second floor landing.  Worse, it doesn't look like work will resume any time soon. I'm not entirely sure why, but all this chaos has invaded my sewing area too and I'm still not able to get much done. So I thought I'd share another Ice Cream Dress I made earlier in the summer that has become an everyday favorite. The fabric here is a cotton Swiss dot I picked up on sale at Joann last summer. It's very lightweight and soft.

As you can see, this dress is perfect for playtime with plenty of room to crawl, roll, pull up, topple, chase brothers, investigate and get into trouble as babies of 10 months are wont to do.

How much do you love the tiny toes?

I cut baby Ice Cream dresses at the length for view A without the bottom band. This is more like a tunic, but is just right for an active baby. I pair them with shorts, bloomers or in this case, just her cloth diaper that matches perfectly.

I also picked this fabric because the darker pink and little bits of olive green seemed like they would take un into early fall with layers. An easy and useful wardrobe staple!

Tuesday, August 16, 2011

Not Quite Everything Tote


Heather Ross's Weekend Sewing is definitely a pretty book and some of the projects are wonderfully inspiring – the summer blouse, the smocked sundress, the weekend away travel bag – but I have found that the actual patterns can be unreliable.  Don’t skip these projects, though, if they appeal to you, just be sure to do a little research first. I recently had a disastrous experience with the pajama pants and feel consequently wary about the other clothing patterns. However, the summer blouse is calling me and enough people in the online sewing community have reviewed it that I think I could make it work.

I actually bought the book for the Everything Tote and made it two years ago for a trip to England. I use the original for day trips and to haul my workout stuff to the studio. The bag is still a favorite and I’ve always wanted to make it again to iron out the kinks. One problem is that it’s so big and floppy that stuff falls all over and gets lost in the bottom. This time, I wanted something a little smaller, so I photocopied the pattern at about 60% and shortened the handles.


To correct the floppiness, I used some mid weight craft interfacing to give the bag structure. I have to say, though, that it might have ended up just a hair more stiffness than I really wanted. Another idea might have been a layer of flannel in between a la Amy Karol’s bag sewing method for a softer shape. It will probably soften with use, though.

The straps are designed to open up where you carry them for a comfortable grip. They can also flash a bit of a fun lining.  Essentially, they are a lined bias strip – two layers sewn together and turned like a strap, then folded like bias tape. The trouble is that where you attach this piece to the bag, you end up with 10 layers of fabric to sew through! This was really difficult and my topstitching on the original bag was really messy. This time, I cut the lining for the handles several inches shorter, so that it would only be lined where it’s designed to show. This way, I wouldn’t have to sew through those extra 4 layers when attaching the bias handles to the top of the tote. It worked perfectly and made assembly much easier.


The instructions call for lining the bias pieces that top the sides of the bag even though that lining would be completely enclosed. Again, you would end up with 10 layers to somehow neatly edge stitch. That didn’t make any sense to me so I skipped it.

Finally, I stitched the bias handles together in one continuous loop at before attaching them to the bag. I lined up the seams with the side seams of the bag and stitched them as you would for a garment facing. I ended up with a smooth neat seam rather than the bulky awkward overlap the instructions want you to hand sew closed. 


I kept the pockets full size so I won’t loose my lip gloss or hand sanitizer or keys in the bottom. And I made one pocket just the right size for my crackberry. Because I really hate loosing that. This is for those summer days when you don’t want to carry everything. It’s big enough for a book or some small knitting or just one spare diaper, toys and snacks. But it doesn’t feel like you’re lugging around a huge diaper bag.


I’m taking a break from sewing this week, because this is what’s going on at my house right now:


We do pretty much everything ourselves around here as you can see. This is our second floor family room, our favorite space, so cross your fingers it gets done soon!

Monday, August 8, 2011

Summer Habitat


A special girl in my life recently had her first birthday. Since I know her mama appreciates handmade things, I decided to whip up a fun little outfit that she could wear right now in the hottest and stickiest part of the year. But while Miss V is all cuteness and fun, she’s not really in to the pink frills like my Kitty. She has a sophisticated modern taste and her wardrobe reflects this. To attain the hip aesthetic needed here, I again turned to Habitat by Philly designer Jay McCarroll. 


As a rule, I don’t choose a very bold or large prints for baby clothes. But sometimes, an unexpected large scale can be interesting. And in small does, the effect can be striking. The Oliver andS Ruffled Halter is a canvas suitable for something larger in scale. The large ruffles are cut on the bias, which tempers the boldness of the rich fabric. The abstract nature of the print "drop cloth" makes the large scale more palatable on a small child.  Mostly, though, it’s the big personality of this little lady that makes the whole thing work.


Like all Oliver and S patterns, this one is clever and clear. Although it’s a free pattern, it lacks none of their trademark attention to detail. I made some very small changes. For one, I hemmed the edges of the ruffles using my narrow hem foot, rather than let them fray as the pattern suggests. Also, I used a solid cotton voile for the base layer of the top. It’s hot and sticky here and since this fabric is just a little thicker and stiffer than I would normally put on a small child, I wanted to reduce the overall bulk. The pattern came together quickly and easily. The construction is unusual, so don't adlib the instructions. With French seams at the sides, the entire thing is neatly finished inside and out. 


I paired the ruffled halter with the Puppet Show shorts in a natural linen from my stash. The linen picks up a minor color in the drop cloth print tones down the overall boldness of the outfit. This combination is perfect for a new toddler who still spends time crawling. Dresses – cute as they are – just get in the way right now. This pairing accommodates her activity, but doesn’t sacrifice in cuteness or girly charm. Also, I think she’ll be able to wear it under a little cardigan once the weather cools.


I’m pleased to report that the gift was a huge hit with both the birthday girl and her mama. I was very happy to receive these pictures demonstrating how perfectly this ensemble suits Miss V!  It’s such a great feeling when a project comes together like this.

photos (and model) by Amanda Hall Studios

Tuesday, August 2, 2011

Sorbetto top pattern review and FBA how-to

Something I’ve been avoiding for a while now – in addition to vacuuming, making a budget and loosing baby weight (bleh!) – is learning how to properly make a full bust adjustment, or FBA.  I’ve avoided thus far it by choosing patterns that have strategic gathers, tucks, ties and elastic. Sometimes I “cheat” by grading patterns out at the bust and in at the high waist and sometimes I just let things be a little too snug in the bust. After all, that’s how ready-to-wear fits me, so I’m used to it. But the reality is that trying to stuff 34DDs (or more!) into patterns designed for a B cup mostly doesn’t work out. Clothes are unflatteringly snug across the bust and gape in a weird way at the shoulder.  Since I’m slowly moving away from nursing tops and could use more hot weather wear, it seemed like a good time to learn.  

Prime choice for this experience is the Colette Patterns Sorbetto top.  It already has a bust dart and since Colette patterns are based on a C cup rather than B like the big companies, I’ll have a little less to adjust. Since it’s a simple tank pattern, I can focus on the bust fitting.


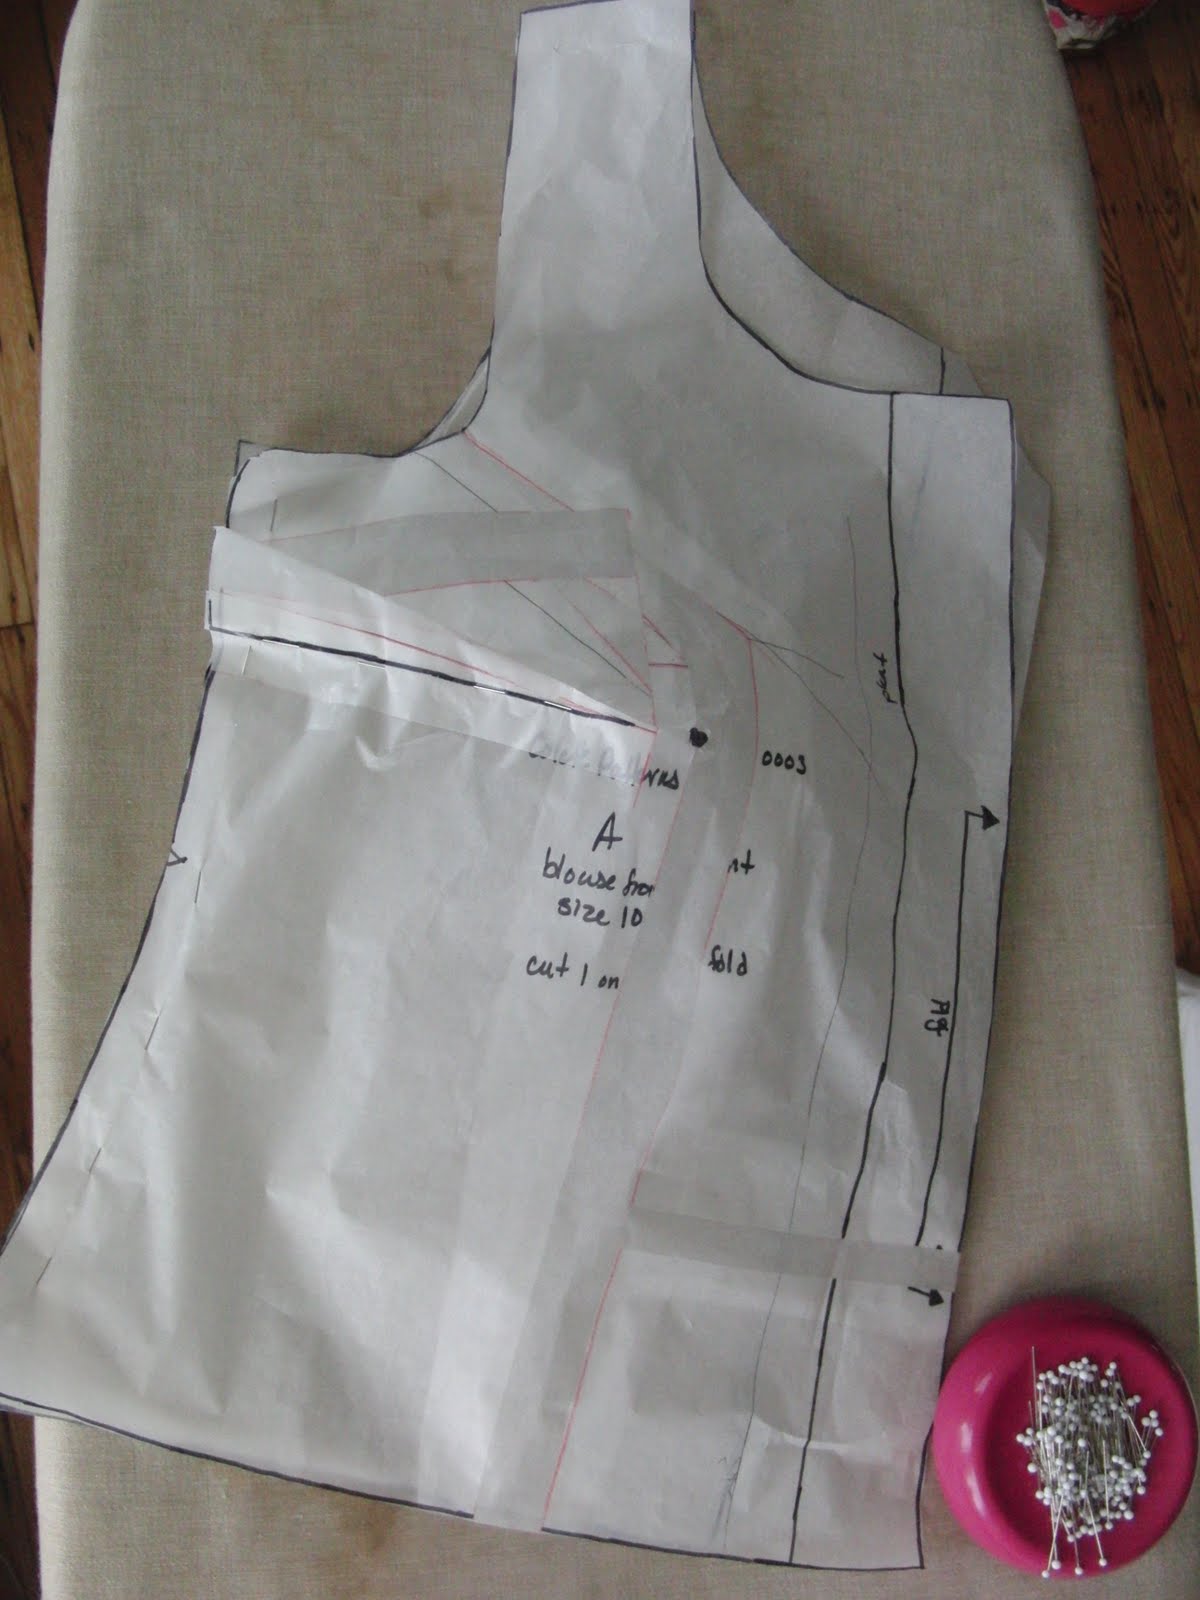
I cut a size 10 based on my high bust measurement.  I traced the pattern, pinned the front and back together and tried it on. Comparing my center front with the pattern center indicated I needed at least an inch so I made my red marks, then slashed it carefully.

Draw one line from the hem, to the "apex" and then to 1/3 of the way into the armpit. Draw a second line through the dart to the apex.

I did the adjusting and taping on my ironing board with a fresh piece of tracing paper underneath. This way, I could pin down the pattern paper to move it accurately and tape it right to the fresh paper without fear of shifting anything. A clear grid ruler helped line things up properly.

Cut almost all the way along these lines, leaving them just barely attached to each other.

Then I cut out the adjusted pattern piece, pinned it all together again and tried it on again. The dart seemed big enough but too high up! I marked my bust “apex” (does that term crack you up too?), drew a block around the entire dart, cut it out, shifted it down and taped again to yet more fresh paper.

cut out then entire dart and shift it up or down
Pinned the paper, tried it on again. The fit was better, but I don’t think I adjusted the dart enough the first time even though I thought I measured carefully because the center front of the pattern wasn’t quite making it to my center front. Sigh. The shape of the adjusted bust dart looked fine, so I decided that rather than re-adjust the dart or start over, I would add a half inch to the center front when I cut the fabric. The girls may still be a tiny bit squished into this top, but they’re used to that, poor babes. 

pattern paper all pinned together.

I ironed the tracing paper a little since it was quite creased after all that folding and pinning. Then I traced and cut the fabric. I marked the dart carefully. I pinned and tried on the fabric pieces before actually stitching them, which I typically do after cutting pieces. Since I had taken so much trouble with the “tissue fitting”, I was tempted to skip this.  I’m glad I didn’t because fabric doesn’t behave the same way as paper. The bust darts were way too low and somehow – after adding 2 inches overall, there still wasn’t enough room for the girls! Apparently the darts do settle a little in the fabric as Palmer says. I didn’t need to move the bust darts down after all, so I retraced them up higher and fitted them again. This time it all looked good. After deepening the bust dart and allowing more room in the center, I added 2 ½” total. 

the finished adjusted dart. You can sort of see here how large it is.

I stitched the shoulders and side seams – French seams work very well here – and then looked at the pleat, though the directions have you stitch the pleat first. I wanted to play with the pleat and maybe leave the bottom free to swing, which did not drape nicely with this fabric, which is after all not fashion fabric and a rather stiff quilting cotton. I also thought I might do an inverted pleat, which did not flatter my full bust. I found the pleat most flattering as designed. But I did make the pleat smaller to squeeze in still more room for the bust.

The long and short of the FBA – it’s a necessary skill to have in your arsenal for patterns like this. The Palmer-Pletch method is a good one, I think, but it’s no magic pill. This is a process of trial and error and will require a fair bit of practice to perfect.  In fact, each different type of garment will require a different kind of adjustment, as will different kinds of fabrics. If I were planning a very special project like a suit or evening gown (yeah right!), I would also make a muslin in a cheap fabric similar to the final fabric to be sure the fit is correct.  Despite this long post, making the FBA is not quite as much effort as it seems and I’m confident it will get easier with practice.  And since a full bustline is nothing to complain about, I’ll happily suck it up and take the extra time to flatter the girls.

The upside to working out how to do an FBA – and this is a great upside – is that you’ll get to cut a smaller size. I know it’s just vanity, but it still feels good. Oh, and your clothes will fit better. That’s nice too.

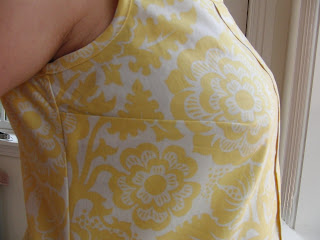
here you can see that the shoulders fit properly, with no weird armpit gaping.

Sorbetto was perfect for practicing the FBA, because there isn’t actually much else to it. It’s a simple but well designed pattern and comfortable to wear. The neck line is neither too high nor too low, just right to open up the face and flatter. The back neck is low – like a boat neck – and feels breathable on sticky days. The armsyces and shoulder straps are just right for comfort and covering a bra properly. The outside bias facing is a sophisticated detail. I’m for once quite pleased with how my bias came out. I rarely produce satisfying topstitching, but this time I went s-l-o-w-l-y and am actually quite pleased with it. I plan to make this again and I think it would work well in a variety of fabrics, with all kinds of possible adornments. I would really love this in seersucker or Liberty.


The fabric is from Joel Dewberry’s new line, Heirloom. It is definitely better suited to quilting or crafting, as it’s quite stiff and a tiny bit rough, but it called to me and I’m sure you know how that is. The Sorbetto handled the structure just fine, and though I’d prefer lawn or voile, I have been happily wearing this version. In the shop, I was drawn to how the lipstick colorway of shot cotton contrasted cheerfully with the soft yellow. I liked the idea of the pink piping on a yellow child’s dress. For more grown-up fun, I added a contrasting hem facing. I like the idea of a little bit of pink peeking out, a little treat just for me. What do you think?


resources: Simplicity has a Fit Brochure you can download for free. There are several posts on the Lisette blog regarding fitting resources as well as a tutorial on the Sew Mama Sew blog. I also found many discussions and links on Sewing Pattern Review.

[edited to add: if you haven't seen it already, Sarai has just posted a large bust adjustment tutorial for her Rooibus sew along. Even if you're not doing the Rooibus with her, I think it's worth reading.]